
Smyrna Wood Flooring offers hardwood floor staining in Smyrna, GA after more than 20 years of sanding and finishing wood floors, serving surrounding cities including Vinings, Fair Oaks, Mableton, Marietta and Austell. Every color we apply is chosen from stain samples laid on your own freshly sanded floor, in your own light, because that is the only way to know how a stain will actually look in your home.
Staining is where a refinish succeeds or disappoints. The same can of stain looks different on red oak and white oak, darker by a south window than in a hallway, and warmer under an oil-based finish than a waterborne one. A color picked from a chip or a photo online is a guess until it is on your wood.
We treat color as part of the sanding process, not an afterthought. The floor is sanded evenly so it takes stain evenly, samples go down side by side, and the chosen color is applied across the whole floor in one continuous session.
Choosing a Stain Color
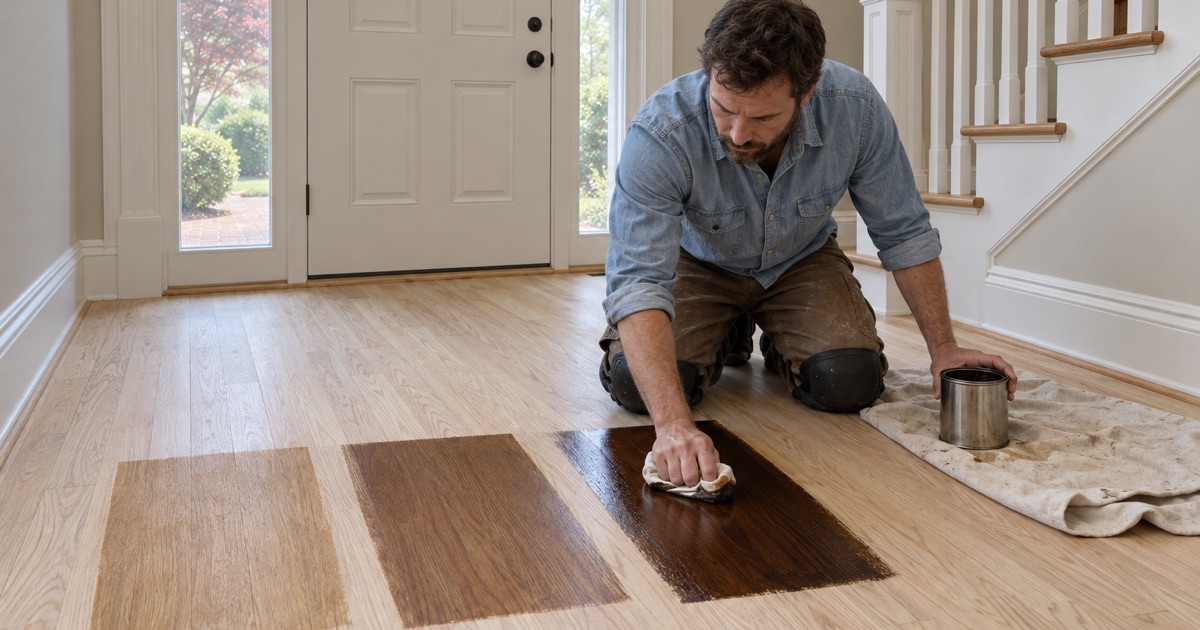
Samples on Your Own Floor
After sanding, we lay several stain samples directly on your floor, usually in a spot you see every day. Each sample is labeled and sealed with a bit of the finish you plan to use, because the topcoat changes the color too.
You look at them in morning and evening light before choosing. Many people end up picking a color they would never have chosen from a brochure, once they see it on their own wood.
How Species Changes the Color
Red oak has a pink undertone that pushes stains warmer, and its open grain soaks up pigment in bold stripes. White oak is more neutral and takes grays and browns more evenly, which is why it suits modern color choices.
Heart pine and other pines blotch easily under stain and usually look best with a clear finish. Maple and hickory each have their own quirks. We tell you what to expect from your species before sampling, so there are no surprises.
Popular Colors and How They Live
Natural and light browns show the least dust and wear, and they let the grain lead. Mid-tone browns hide pet hair and scratches well and suit most homes. Dark stains look dramatic but show every footprint and scratch in the finish.
Gray and whitewashed looks are popular on white oak, and they need careful application to stay even. We talk through how each color will look after a year of everyday life, not just on the day it goes down.
Getting an Even Color
Sanding for Stain
Stain exposes every flaw in the sanding. Swirl marks from an orbital sander, chatter from a drum sander or a skipped grit all show up as dark lines once pigment hits the wood.
We sand through a full grit sequence and finish with a careful final pass matched to the stain we are using. That extra care is what makes a stained floor look uniform instead of blotchy. Edges along walls and cabinets get the same attention as the open floor, since a dark ring around the room is the most common sign of a rushed stain job.
Water Popping for Darker Colors
Water popping means lightly wetting the sanded floor to raise the grain, so it opens up and takes stain more deeply and evenly. It is especially useful for darker colors on oak, which can otherwise look patchy.
The floor has to dry completely after popping before stain goes on, and humid Georgia summers can stretch that wait. We build the time into the schedule rather than rushing it, and we run the air conditioning or a dehumidifier when the day is humid so the floor dries evenly from room to room.
Blending Repairs and Patched Boards
When a floor has new boards woven in, the new and old wood absorb stain differently. We sample on both and adjust, sometimes mixing a custom color, so the repaired area disappears under the finish.
The same care applies where a stained floor meets stairs or a room refinished at another time. Matching those edges is often harder than staining the whole floor. We plan the stopping points at doorways and thresholds, where a slight difference in tone reads as a natural break rather than a mistake.
Changing an Existing Color
Moving Away From Orange Oak
Many oak floors have turned orange or yellow under an old oil-based finish, a look sometimes called orange oak. Sanding to bare wood removes it, and a neutral stain or a clear waterborne finish keeps it from returning.
This is one of the most common reasons people call us. The floor underneath is usually in good shape; it is the color that has dated it. Choosing a waterborne topcoat after the new stain also means the color you pick now is much closer to the color you will still have in ten years.
Updating 1980s Honey Oak
The honey tones found in many 1980s subdivisions can be sanded out and replaced with a brown, gray or natural look. Before we quote a color change on these site-finished floors, we check how much wood remains above the tongue.
If the floor has been sanded several times, a big color change may not be possible. We tell you plainly, and suggest what can be done with the wood that is left.
Stain Under the Right Finish
The finish over a stain changes its final look. An oil-modified polyurethane warms the color and ambers with time, while a waterborne finish keeps it truer to the sample.
Hardwax oil systems can combine color and finish in one product for a soft, low-sheen look. We finish your samples with the product we plan to use, so the color you approve is the color you get.
- 20+ Years on Wood Floors
- Moisture Readings Before Repairs
- Stain Samples on Your Floor